[TIL/React] 2024/09/06
✅ API Reference - useMutationState MutationCache에 존재하는 모든 mutation에 접근할 수 있도록 하는 hook이다. 1)filter를 통해 mutation을 좁힐 수 있고, 2)select를 통해 mutation의 상태를
✅ API Reference - useMutationState
MutationCache에 존재하는 모든 mutation에 접근할 수 있도록 하는 hook이다.
1)filter를 통해 mutation을 좁힐 수 있고, 2)select를 통해 mutation의 상태를 변환할 수 있다.
각각이 무엇을 의미하는지 정리하도록 하겠다.
Example 1 ✍️
import { useMutationState } from '@tanstack/react-query'
const variables = useMutationState({ filters: { status: 'pending' }, select: (mutation) => mutation.state.variables, })
filter와 select를 통해, 현재 진행 중인 모든 Mutation의 변수들을 가져오는 방법에 관한 공식문서 예제


## Example 2 ✍️
import { useMutation, useMutationState } from '@tanstack/react-query'

const mutationKey = ['posts']

// Some mutation that we want to get the state for
const mutation = useMutation({
  mutationKey,
  mutationFn: (newPost) => {
    return axios.post('/posts', newPost)
  },
})

const data = useMutationState({
  // this mutation key needs to match the mutation key of the given mutation (see above)
  filters: { mutationKey },
  select: (mutation) => mutation.state.data,
})
mutationKey를 통해, 특정 mutation에 대한 모든 데이터를 가져오는 방법에 관한 공식문서 예제
Example 3 ✍️
import { useMutation, useMutationState } from '@tanstack/react-query'
const mutationKey = ['posts']
// Some mutation that we want to get the state for const mutation = useMutation({ mutationKey, mutationFn: (newPost) => { return axios.post('/posts', newPost) }, })
const data = useMutationState({ // this mutation key needs to match the mutation key of the given mutation (see above) filters: { mutationKey }, select: (mutation) => mutation.state.data, })
// Latest mutation data const latest = data[data.length - 1]
mutationKey를 통해 최신 Mutation 데이터에 접근하는 방법에 관한 공식문서 예제

useMutationState가 반환하는 배열의 마지막 항목에 접근한다는 의미이다.


## 예제 코드 ✍️
import React from "react"; import { useQuery, useMutation, useMutationState } from "@tanstack/react-query"; import axios from "axios";
// Fetch 'posts/users' using jsonplaceholder const fetchPosts = async () => { const { data } = await axios.get( "https://jsonplaceholder.typicode.com/posts" ); return data; };
const fetchUsers = async () => { const { data } = await axios.get( "https://jsonplaceholder.typicode.com/users" ); return data; };
// Add a new 'post/user' mutation const addPost = async (newPost) => { const { data } = await axios.post( "https://jsonplaceholder.typicode.com/posts", newPost ); return data; };
const addUser = async (newUser) => { const { data } = await axios.post( "https://jsonplaceholder.typicode.com/users", newUser ); return data; };
const App = () => { // Fetch posts using useQuery const { data: posts, isLoading: isPostsLoading } = useQuery({ queryKey: ["posts"], queryFn: fetchPosts, });
// Fetch users using useQuery const { data: users, isLoading: isUsersLoading } = useQuery({ queryKey: ["users"], queryFn: fetchUsers, });
// Create a post mutation const postMutation = useMutation({ mutationKey: ["posts"], mutationFn: addPost, });
// Create a user mutation const userMutation = useMutation({ mutationKey: ["users"], mutationFn: addUser, });
// Example 1 ✍️: Get all variables of all running mutations (both posts and users) const pendingMutations = useMutationState({ filters: { status: "pending" }, select: (mutation) => mutation.state.variables, });
// Example 2 ✍️: Get all data for specific mutations (posts) const postsMutationState = useMutationState({ filters: { mutationKey: ["posts"] }, select: (mutation) => mutation.state.data, });
// Example 2 ✍️: Get all data for specific mutations (users) const usersMutationState = useMutationState({ filters: { mutationKey: ["users"] }, select: (mutation) => mutation.state.data, });
// Example 3 ✍️: Access the latest mutation data for posts const latestPostMutation = postsMutationState?.[postsMutationState.length - 1];
// Example 3 ✍️: Access the latest mutation data for users const latestUserMutation = usersMutationState?.[usersMutationState.length - 1];
if (isPostsLoading || isUsersLoading) { return
return (
Posts
{posts?.map((post) => (
{post.title}
{post.body}
{postMutation.isLoading &&
Users
{users?.map((user) => ({user.name}
{user.email}
{userMutation.isLoading &&
Pending Mutation Variables (Example 1):
{JSON.stringify(pendingMutations, null, 2)}
Latest Post Mutation Data (Example 3):
{latestPostMutation ? ({latestPostMutation.title}
{latestPostMutation.body}
Latest User Mutation Data (Example 3):
{latestUserMutation ? ({latestUserMutation.name}
{latestUserMutation.email}
export default App;
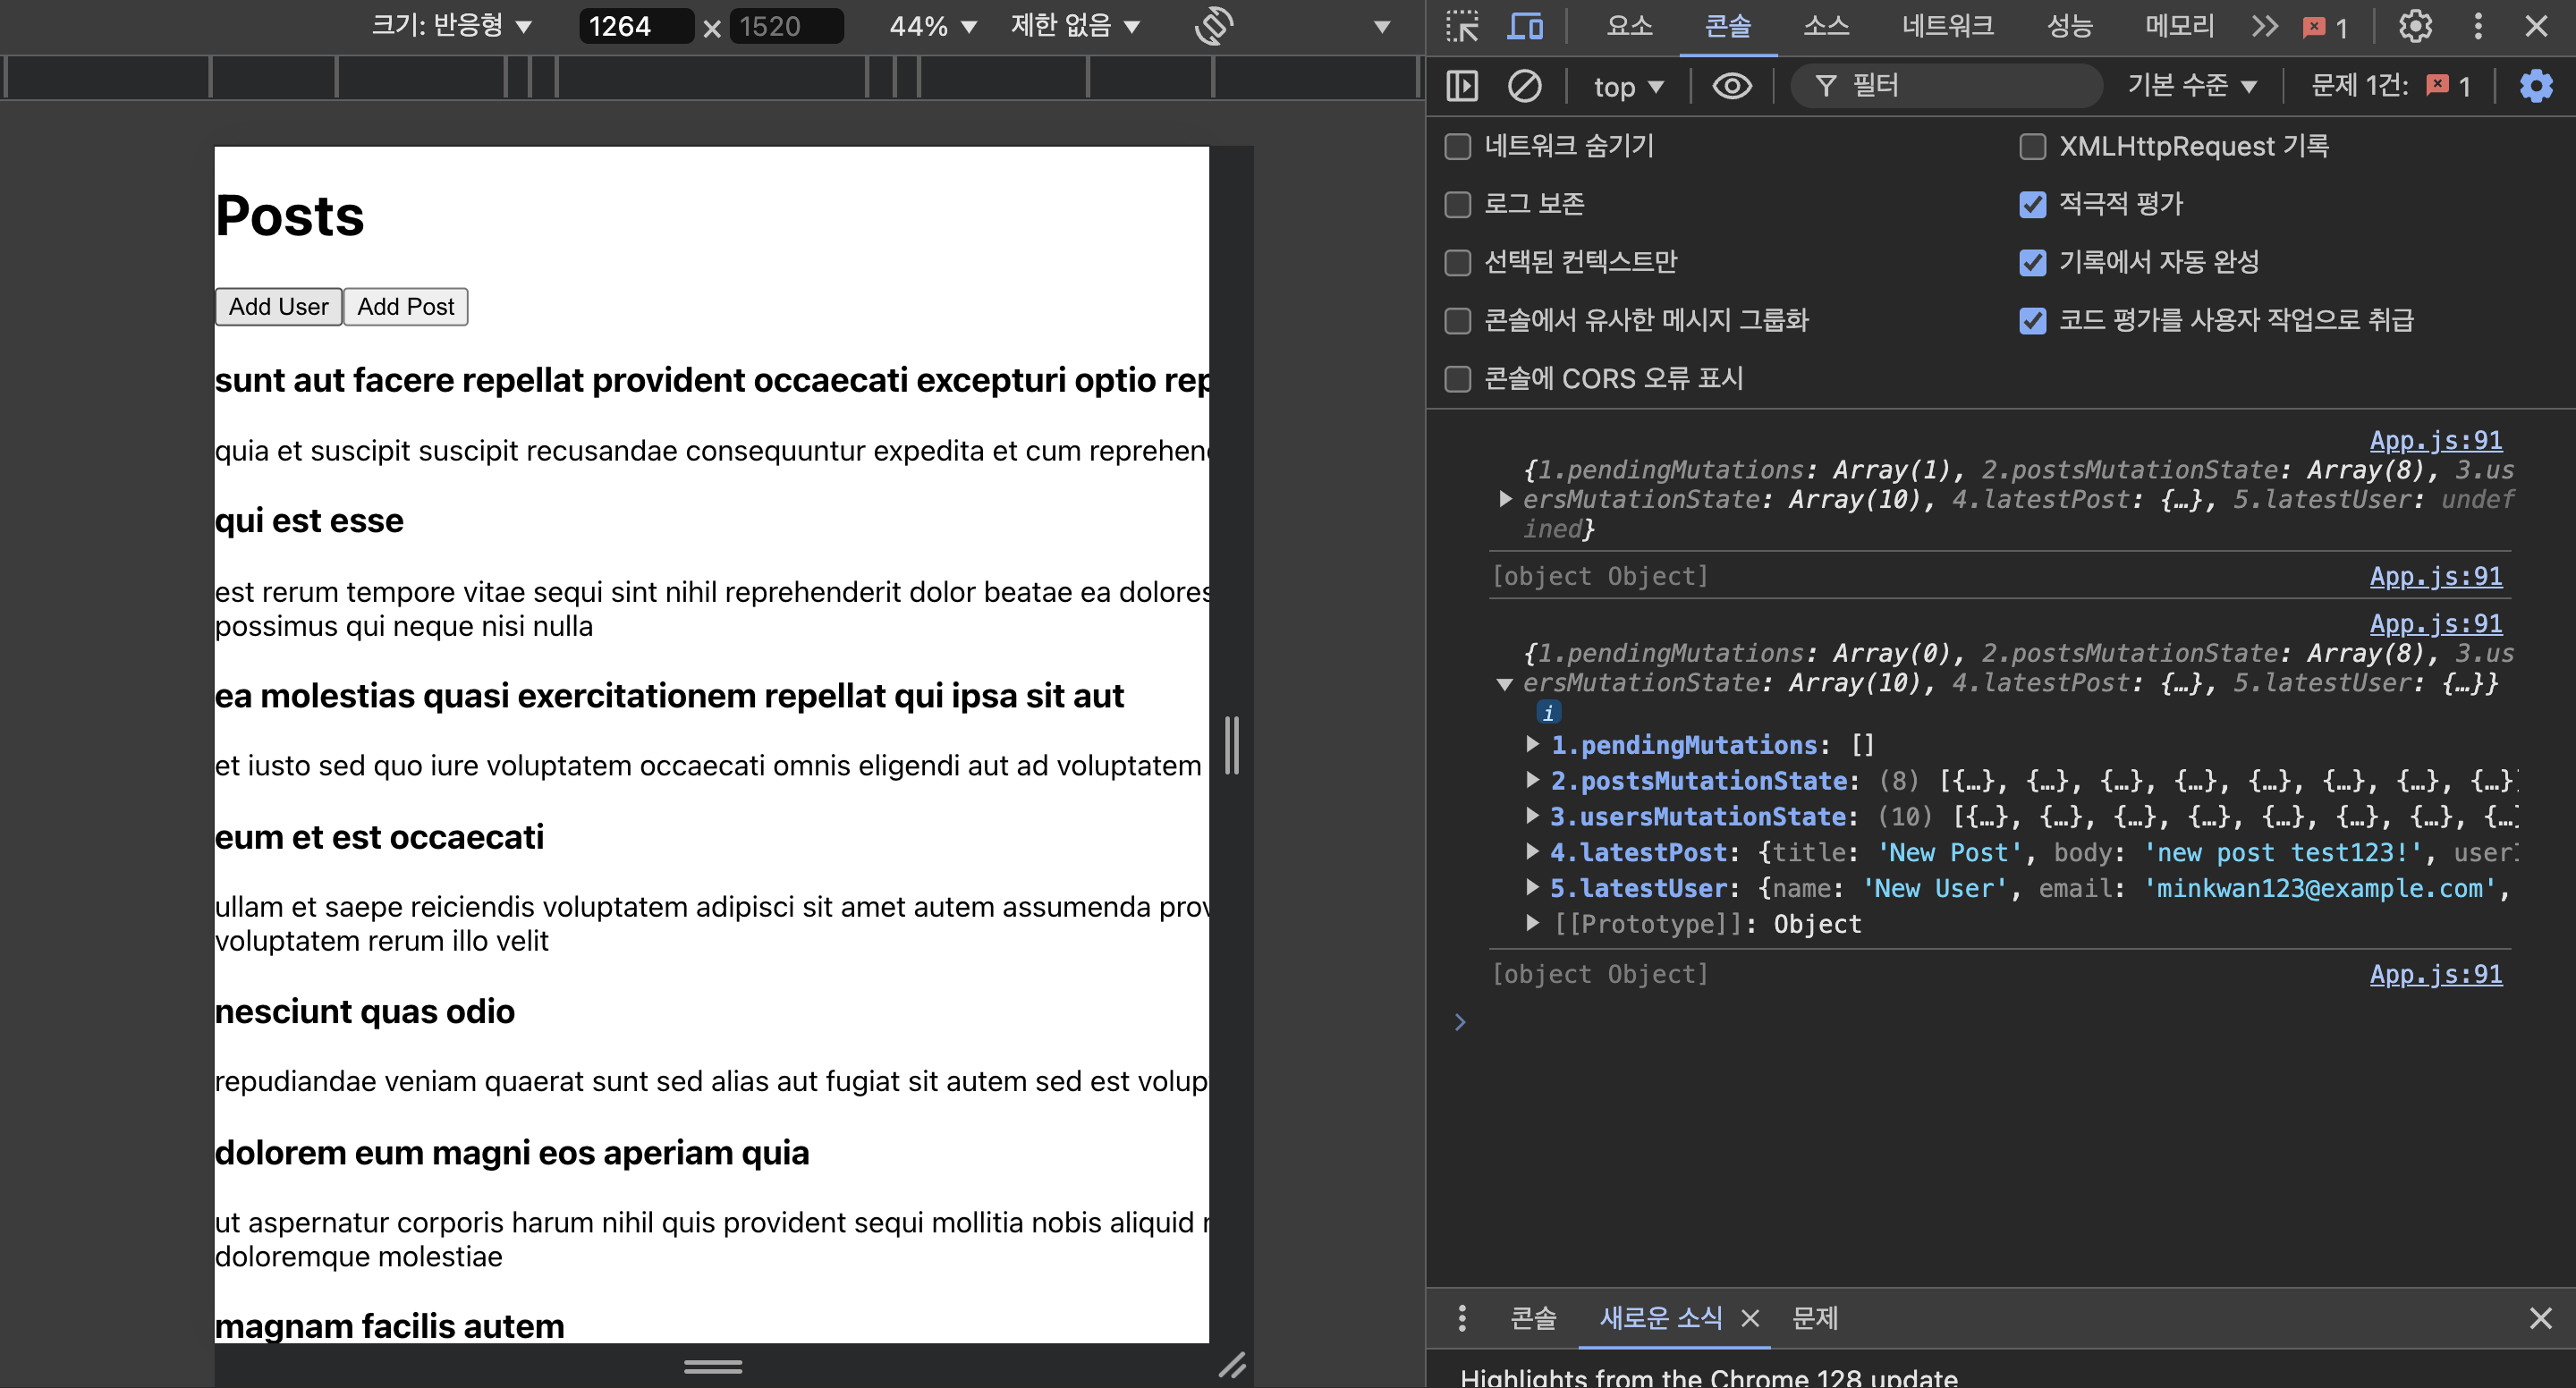
다섯 가지 콘솔을 각각 주석처리를 통해 확인하면, useMutationState에 대해 쉽게 이해할 수 있다.
> **✅ API Reference - useSuspenseQuery**
useSuspenseQuery는 useQuery와 유사하지만, 특별한 목적을 갖는 hook이다.
React의 Suspense 개념을 활용하여 데이터를 로딩하는 동안 fallback UI를 표시하기 위한 목적으로 사용한다.
useSuspenseQuery를 사용하면 로딩 상태와 데이터 상태를 처리하기 위해 별도의 로직을 작성할 필요가 없기 때문에, 코드의 가독성을 제고할 수 있다는 장점이 있다.
## 기본 형태 ✍️
const result = useSuspenseQuery(options)
## Options ✍️

1. ```throwOnError```: 오류가 발생했을 때, 예외를 던질지 여부를 설정한다. 기본값은 true이고, React의 error boundary에서 해당 오류를 잡아서 처리할 수 있다.

2. ```enabled```: useSuspenseQuery에서는 사용 불가능하다.

3. ```placeholderData```:  useSuspenseQuery에서는 사용 불가능하다. 데이터 로딩 중에는 기본적으로 suspense의 fallback UI가 표시된다.

## Returns ✍️

1. ```data```: 쿼리의 데이터가 포함된다. useSuspenseQuery는 데이터가 항상 정의되어 있음을 보장하므로, data는 항상 유효한 값을 갖게 된다.

2. ```isPlaceholderData```: useSuspenseQuery에서는 사용 불가능하다.

3. ```status```: 쿼리의 상태를 나타낸다. useSuspenseQuery에서는 상태가 항상 success로 설정되며, 데이터 로딩 중에는 fallback UI를 표시한다.


## 예제 코드 ✍️
import React, { Suspense } from "react"; import { useSuspenseQuery } from "@tanstack/react-query"; import axios from "axios"; import styled from "styled-components";
// Fetch posts using jsonplaceholder const fetchPosts = async () => { const { data } = await axios.get( "https://jsonplaceholder.typicode.com/posts" ); return data; };
// Styled-components for the loading UI const FallbackContainer = styled.div` display: flex; align-items: center; justify-content: center; height: 100vh; background: #f0f0f0; `;
const Loader = styled.div` border: 8px solid #f3f3f3; border-radius: 50%; border-top: 8px solid #3498db; width: 60px; height: 60px; animation: spin 1.5s linear infinite;
@keyframes spin { 0% { transform: rotate(0deg); } 100% { transform: rotate(360deg); } } `;
const PostsList = () => { // Using useSuspenseQuery const { data: posts } = useSuspenseQuery({ queryKey: ["posts"], queryFn: fetchPosts, throwOnError: true, });
return (
Posts
{posts.map((post) => ({post.title}
{post.body}
const App = () => { return (
export default App;
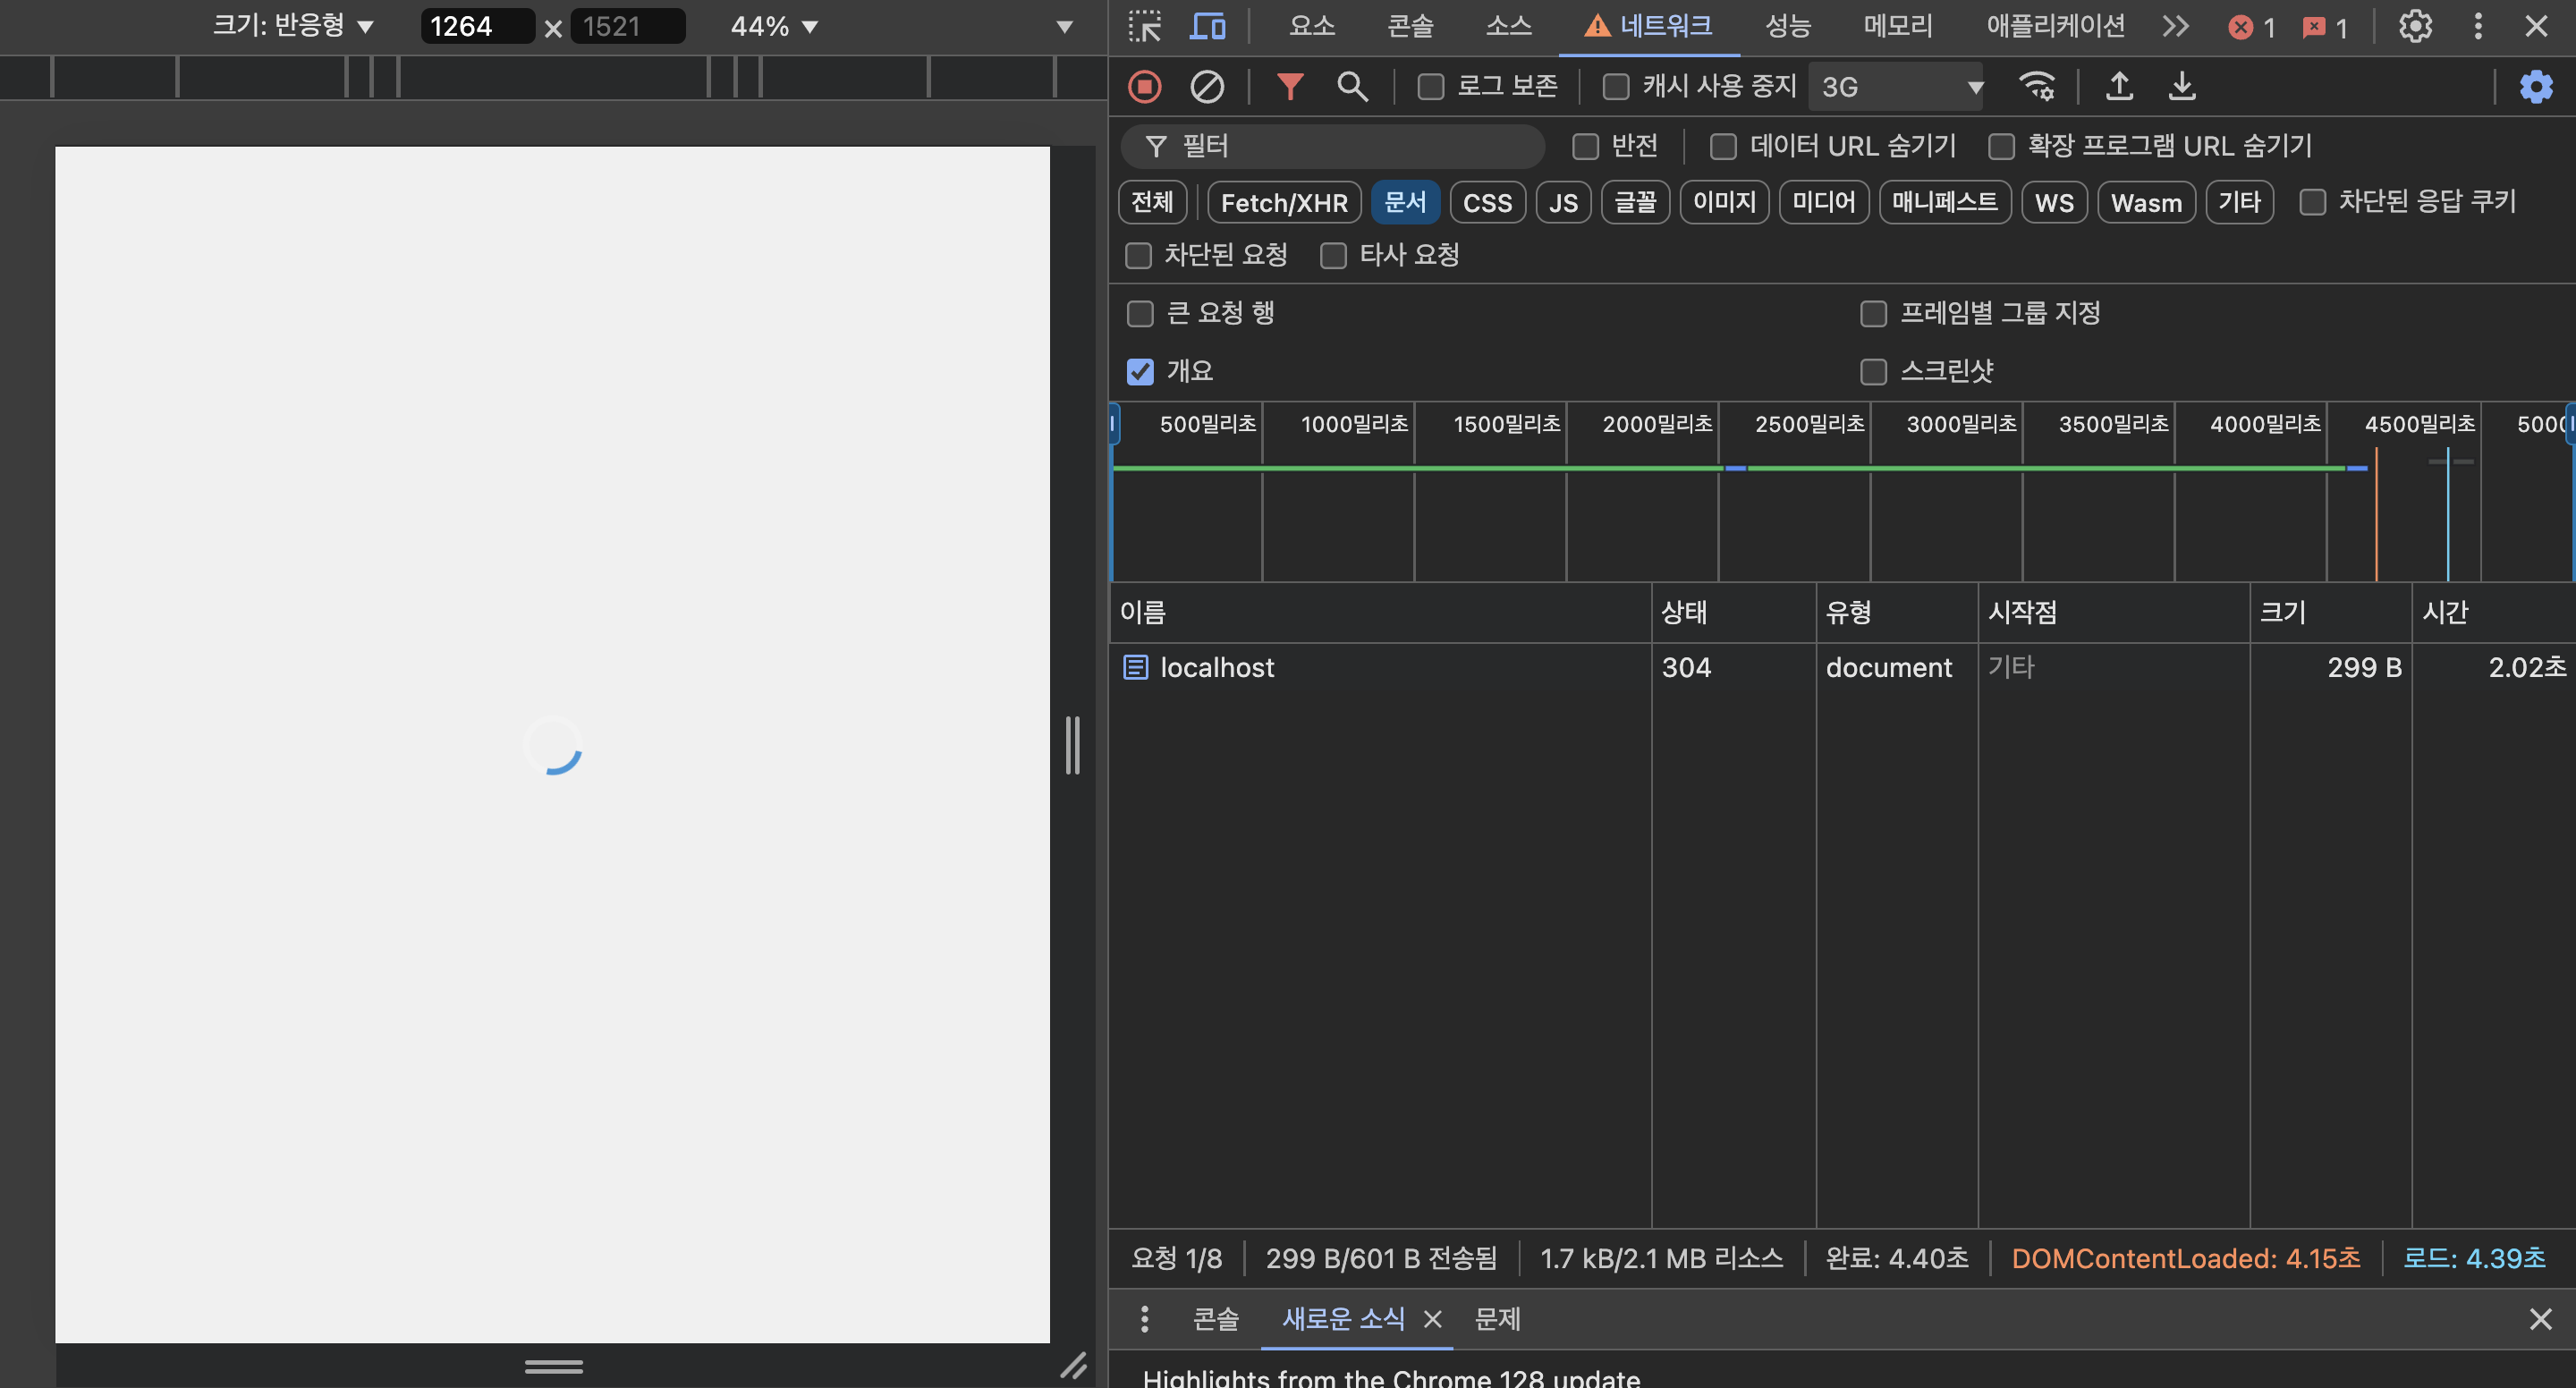
네트워크를 3G로 변경하여 fallback UI가 제대로 작동하는지 테스트했다.
> **✅ Tanstack Query 정리**
살펴본 API
1. useQuery
2. useQueries
3. useInfiniteQuery
4. useMutation
5. useIsFetching
6. useIsMutating
7. useMutationState
8. useSuspenseQuery
이 정도면, 나머지는 필요할 때 적용하면 되겠다는 생각이 들어서 tanstack-query는 여기서 마치겠다.
reference: https://www.youtube.com/watch?v=n-ddI9Lt7Xs&t=551s
More to read
프론트엔드와 백엔드 사이
HTTP 상태 코드는 프론트엔드에서 백엔드로 보냈던 요청의 수행 결과를 의미하는 일종의 약속이며, API를 구성하는 핵심 요소 중 하나입니다. 상태 코드와 관련하여, 백엔드는 잘 모르는 프론트엔드의 슬픈 사정이 있습니다.아래는 요청이 실패했음에도, 백엔드에서 상태 코드
JWT토큰 관리 방식 톺아보기
0. 들어가며 🎯 서비스에 접근하려는 사용자가 누구인지 확인하는 과정을 사용자 인증이라고 합니다. 인증된 사용자에게 주어진 권한을 확인하는 작업은 인가라고 부릅니다. 이번 글에서는 인가는 다루지 않습니다. 사용자 인증에는 많은 방식이 있지만, 오늘은 세션 인증 방
A2AA2A / MCP 멀티 에이전트 오케스트레이션
0. 들어가며 ✍️ Google for Developers에, 레스토랑 공급망 시나리오로 엮은 6대 프로토콜(MCP, A2A, UCP, AP2, A2UI, AG-UI)에 대한 가이드가 게시된 이후, MCP와 A2A부터 구현해 보는 것이 좋을 것 같다는 생각이 들었습니