[TIL/Nest] 2024/09/20
✅ CRUD Blog MVP 모델 만들기 CRUD가 구현된 Blog MVP(Minimum Viable Product) 모델을 만들기 위해 다음과 같은 기술 스택이 동원되었다. : 데이터베이스로 사용 : 백엔드 프레임워크 : 프론트엔드 라이브러리 : JavaScrip
위 썸네일이 결론이다. 각 과정에서 어떤 스택을 사용할 것이며, 마주하는 문제에 대해 어떻게 최적화할 것인지만 달라지는 것이기에, flow 자체를 항상 염두에 두는 것이 중요하다.
✅ CRUD Blog MVP 모델 만들기
CRUD가 구현된 Blog MVP(Minimum Viable Product) 모델을 만들기 위해 다음과 같은 기술 스택이 동원되었다.
1. ``MongoDB``: 데이터베이스로 사용 2. ``NestJS``: 백엔드 프레임워크 3. ``React``: 프론트엔드 라이브러리 4. ``NodeJS``: JavaScript 런타임 5. ``TypeScript``: JavaScript의 상위 언어, 타입 안정성을 제공하기 위해 사용 6. ``Material-UI``: Google에서 제공하는 UI 컴포넌트 라이브러리 7. ``Tanstack-Query``: 서버 상태 관리를 위해 사용하는 라이브러리 8. ``Vite``: 웹 애플리케이션 빌드 도구
✅ 프로젝트 구조
blog/
├── backend/
│   ├── src/
│   │   ├── posts/
│   │   │   ├── posts.controller.ts
│   │   │   ├── posts.module.ts
│   │   │   ├── posts.service.ts
│   │   │   └── schemas/
│   │   │       └── post.schema.ts
│   │   └── app.module.ts
│   └── package.json
├── frontend/
│   ├── src/
│   │   ├── Blog.tsx
│   │   └── api.ts
│   └── package.json
└── README.md
✅ Backend 관련 설정
1-1. NestJS 프로젝트 생성
npm i -g @nestjs/cli nest new backend
@nestjs/cli는 NestJS 애플리케이션을 생성하고 관리하는 데 필요한 CLI 도구다. 해당 CLI를 통해 NestJS 프로젝트를 효율적으로 설정, 구성 및 관리할 수 있다.

1-2. MongoDB 연결
import { Module } from '@nestjs/common'; import { MongooseModule } from '@nestjs/mongoose'; import { PostsModule } from './posts/posts.module';
@Module({ imports: [ MongooseModule.forRoot("mongodb+srv://
2-1. app.module.ts
import { Module } from '@nestjs/common';
import { MongooseModule } from '@nestjs/mongoose';
import { PostsModule } from './posts/posts.module';

@Module({
  imports: [
    MongooseModule.forRoot(
      "mongodb+srv://<username>:<db_password>@cluster0.mongodb.net/"
    ),
    PostsModule, // MongoDB 연결
  ],
})
export class AppModule {}
2-2. post.controller.ts
import { Controller, Get, Post, Body, Patch, Param, Delete } from '@nestjs/common';
import { PostsService } from './posts.service';
import { Post as PostModel } from './schemas/post.schema';

@Controller('posts')
export class PostsController {
  constructor(private readonly postsService: PostsService) {}

  @Get()
  findAll() {
    return this.postsService.findAll();
  }

  @Post()
  create(@Body() post: PostModel) {
    return this.postsService.create(post);
  }

  @Patch(':id')
  update(@Param('id') id: string, @Body() post: Partial<PostModel>) {
    return this.postsService.update(id, post);
  }

  @Delete(':id')
  remove(@Param('id') id: string) {
    return this.postsService.remove(id);
  }
}
2-3. post.service.ts
import { Injectable, NotFoundException } from '@nestjs/common';
import { InjectModel } from '@nestjs/mongoose';
import { Model } from 'mongoose';
import { Post, PostDocument } from './schemas/post.schema';

@Injectable()
export class PostsService {
  constructor(@InjectModel(Post.name) private postModel: Model<PostDocument>) {}

  async findAll(): Promise<Post[]> {
    return this.postModel.find().exec();
  }

  async create(post: Post): Promise<Post> {
    const newPost = new this.postModel(post);
    return newPost.save();
  }

  async update(id: string, post: Partial<Post>): Promise<Post> {
    const updatedPost = await this.postModel.findByIdAndUpdate(id, post, { new: true });
    if (!updatedPost) {
      throw new NotFoundException(`Post with ID ${id} not found`);
    }
    return updatedPost;
  }

  async remove(id: string): Promise<void> {
    const result = await this.postModel.findByIdAndRemove(id);
    if (!result) {
      throw new NotFoundException(`Post with ID ${id} not found`);
    }
  }
}
2-4. post.schema.ts
import { Prop, Schema, SchemaFactory } from '@nestjs/mongoose';
import { Document } from 'mongoose';

export type PostDocument = Post & Document;

@Schema()
export class Post {
  @Prop({ required: true })
  title: string;

  @Prop({ required: true })
  content: string;
}

export const PostSchema = SchemaFactory.createForClass(Post);
✅ Frontend 관련 설정
1-1. React 프로젝트 생성
npx create-react-app frontend --template typescript cd frontend
1-2. 필요한 패키지 설치
yarn add @mui/material @emotion/react @emotion/styled @mui/icons-material react-query
2-1. api.ts
import axios from 'axios';

const API_URL = 'http://localhost:3000/posts';

export const fetchPosts = async () => {
  const response = await axios.get(API_URL);
  return response.data;
};

export const createPost = async (newPost: { title: string; content: string }) => {
  const response = await axios.post(API_URL, newPost);
  return response.data;
};

export const updatePost = async (id: string, updatedPost: { title: string; content: string }) => {
  const response = await axios.patch(`${API_URL}/${id}`, updatedPost);
  return response.data;
};

export const deletePost = async (id: string) => {
  await axios.delete(`${API_URL}/${id}`);
};
2-2. Blog.tsx
import { useState, FormEvent } from "react";
import { useQuery, useMutation, useQueryClient } from "@tanstack/react-query";
import { fetchPosts, createPost, updatePost, deletePost } from "./api";
import {
  Container,
  Typography,
  TextField,
  Button,
  List,
  ListItem,
  ListItemText,
  CircularProgress,
  IconButton,
} from "@mui/material";
import EditIcon from "@mui/icons-material/Edit";
import DeleteIcon from "@mui/icons-material/Delete";

interface Post {
  _id: string;
  title: string;
  content: string;
}

const Blog = () => {
  const queryClient = useQueryClient();
  const { data: posts, isLoading } = useQuery<Post[]>({
    queryKey: ["posts"],
    queryFn: fetchPosts,
  });

  const mutationCreate = useMutation({
    mutationFn: (newPost: { title: string; content: string }) => createPost(newPost),
    onSuccess: () => {
      queryClient.invalidateQueries({ queryKey: ["posts"] });
    },
  });

  const mutationUpdate = useMutation({
    mutationFn: ({ id, updatedPost }: { id: string; updatedPost: { title: string; content: string } }) =>
      updatePost(id, updatedPost),
    onSuccess: () => {
      queryClient.invalidateQueries({ queryKey: ["posts"] });
    },
  });

  const mutationDelete = useMutation({
    mutationFn: (id: string) => deletePost(id),
    onSuccess: () => {
      queryClient.invalidateQueries({ queryKey: ["posts"] });
    },
  });

  const [title, setTitle] = useState<string>("");
  const [content, setContent] = useState<string>("");
  const [editingPostId, setEditingPostId] = useState<string | null>(null);

  const handleSubmit = (e: FormEvent) => {
    e.preventDefault();
    if (editingPostId) {
      mutationUpdate.mutate({ id: editingPostId, updatedPost: { title, content } });
      setEditingPostId(null);
    } else {
      mutationCreate.mutate({ title, content });
    }
    setTitle("");
    setContent("");
  };

  const handleEdit = (post: Post) => {
    setEditingPostId(post._id);
    setTitle(post.title);
    setContent(post.content);
  };

  const handleDelete = (id: string) => {
    mutationDelete.mutate(id);
  };

  if (isLoading) return <CircularProgress />;

  return (
    <Container maxWidth="sm" sx={{ marginTop: 4 }}>
      <Typography variant="h4" align="center" gutterBottom>
        Blog
      </Typography>
      <form onSubmit={handleSubmit}>
        <TextField
          label="Title"
          variant="outlined"
          fullWidth
          margin="normal"
          value={title}
          onChange={(e) => setTitle(e.target.value)}
          required
        />
        <TextField
          label="Content"
          variant="outlined"
          fullWidth
          multiline
          rows={4}
          margin="normal"
          value={content}
          onChange={(e) => setContent(e.target.value)}
          required
        />
        <Button variant="contained" color="primary" type="submit" fullWidth sx={{ marginTop: 2 }}>
          {editingPostId ? "Update Post" : "Create Post"}
        </Button>
      </form>
      <List>
        {posts?.map((post) => (
          <ListItem
            key={post._id}
            secondaryAction={
              <>
                <IconButton onClick={() => handleEdit(post)}>
                  <EditIcon />
                </IconButton>
                <IconButton onClick={() => handleDelete(post._id)}>
                  <DeleteIcon />
                </IconButton>
              </>
            }
          >
            <ListItemText primary={post.title} secondary={post.content} />
          </ListItem>
        ))}
      </List>
    </Container>
  );
};

export default Blog;
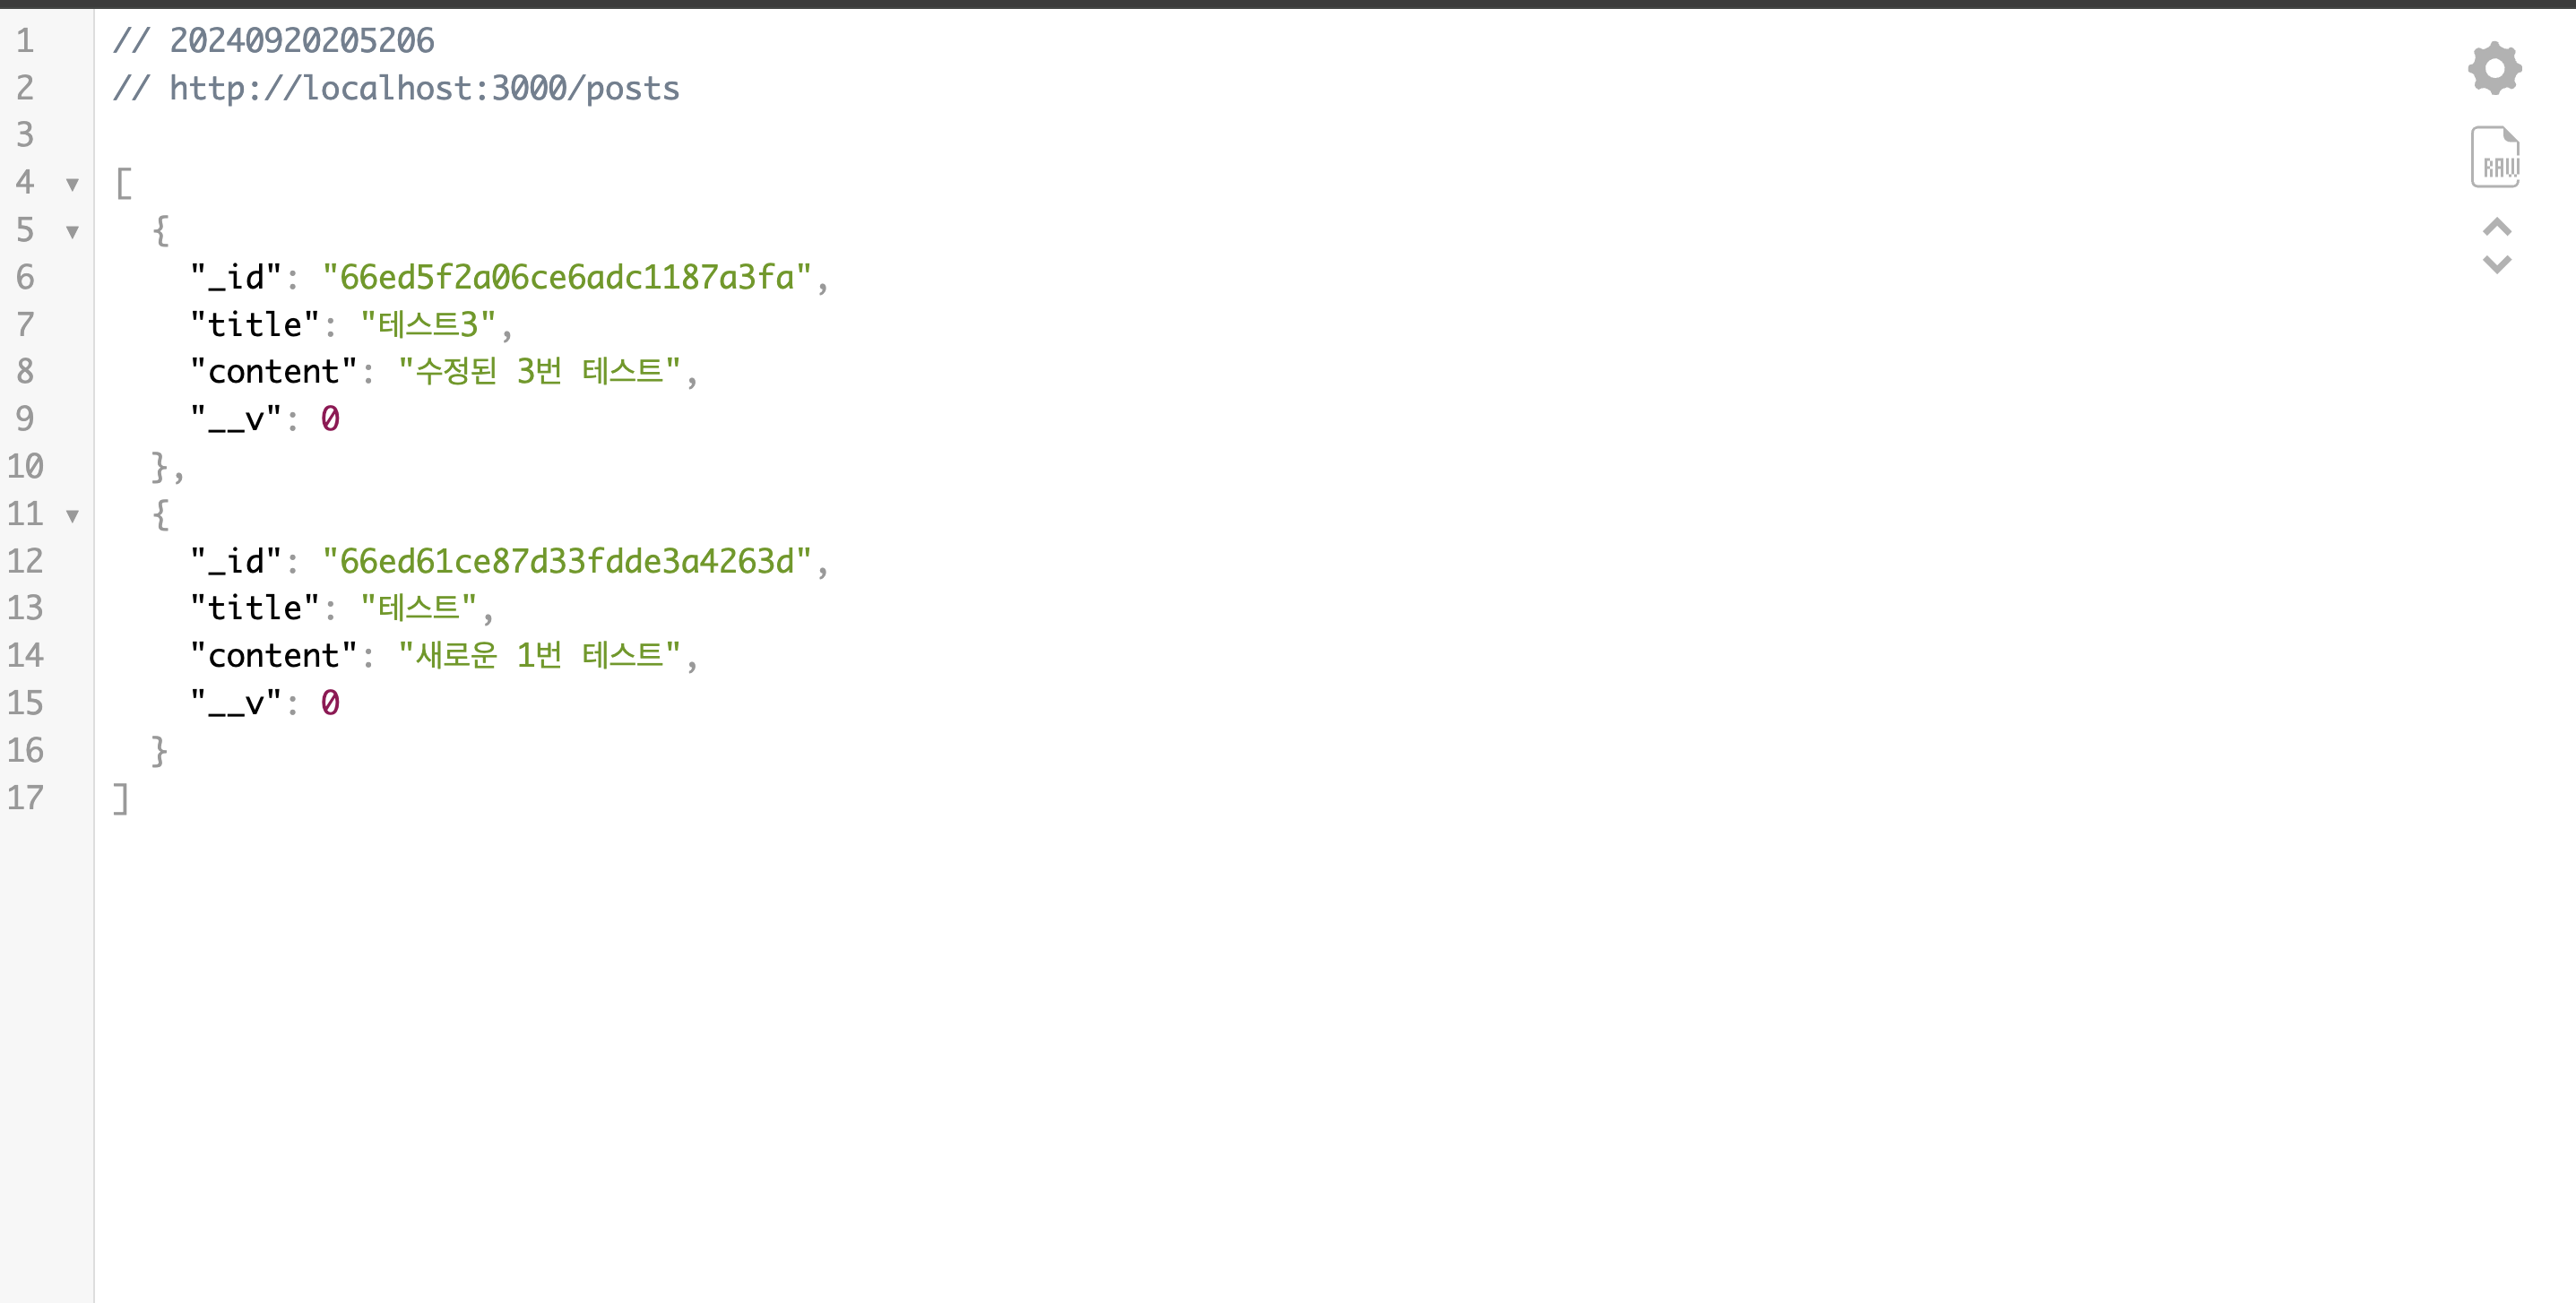
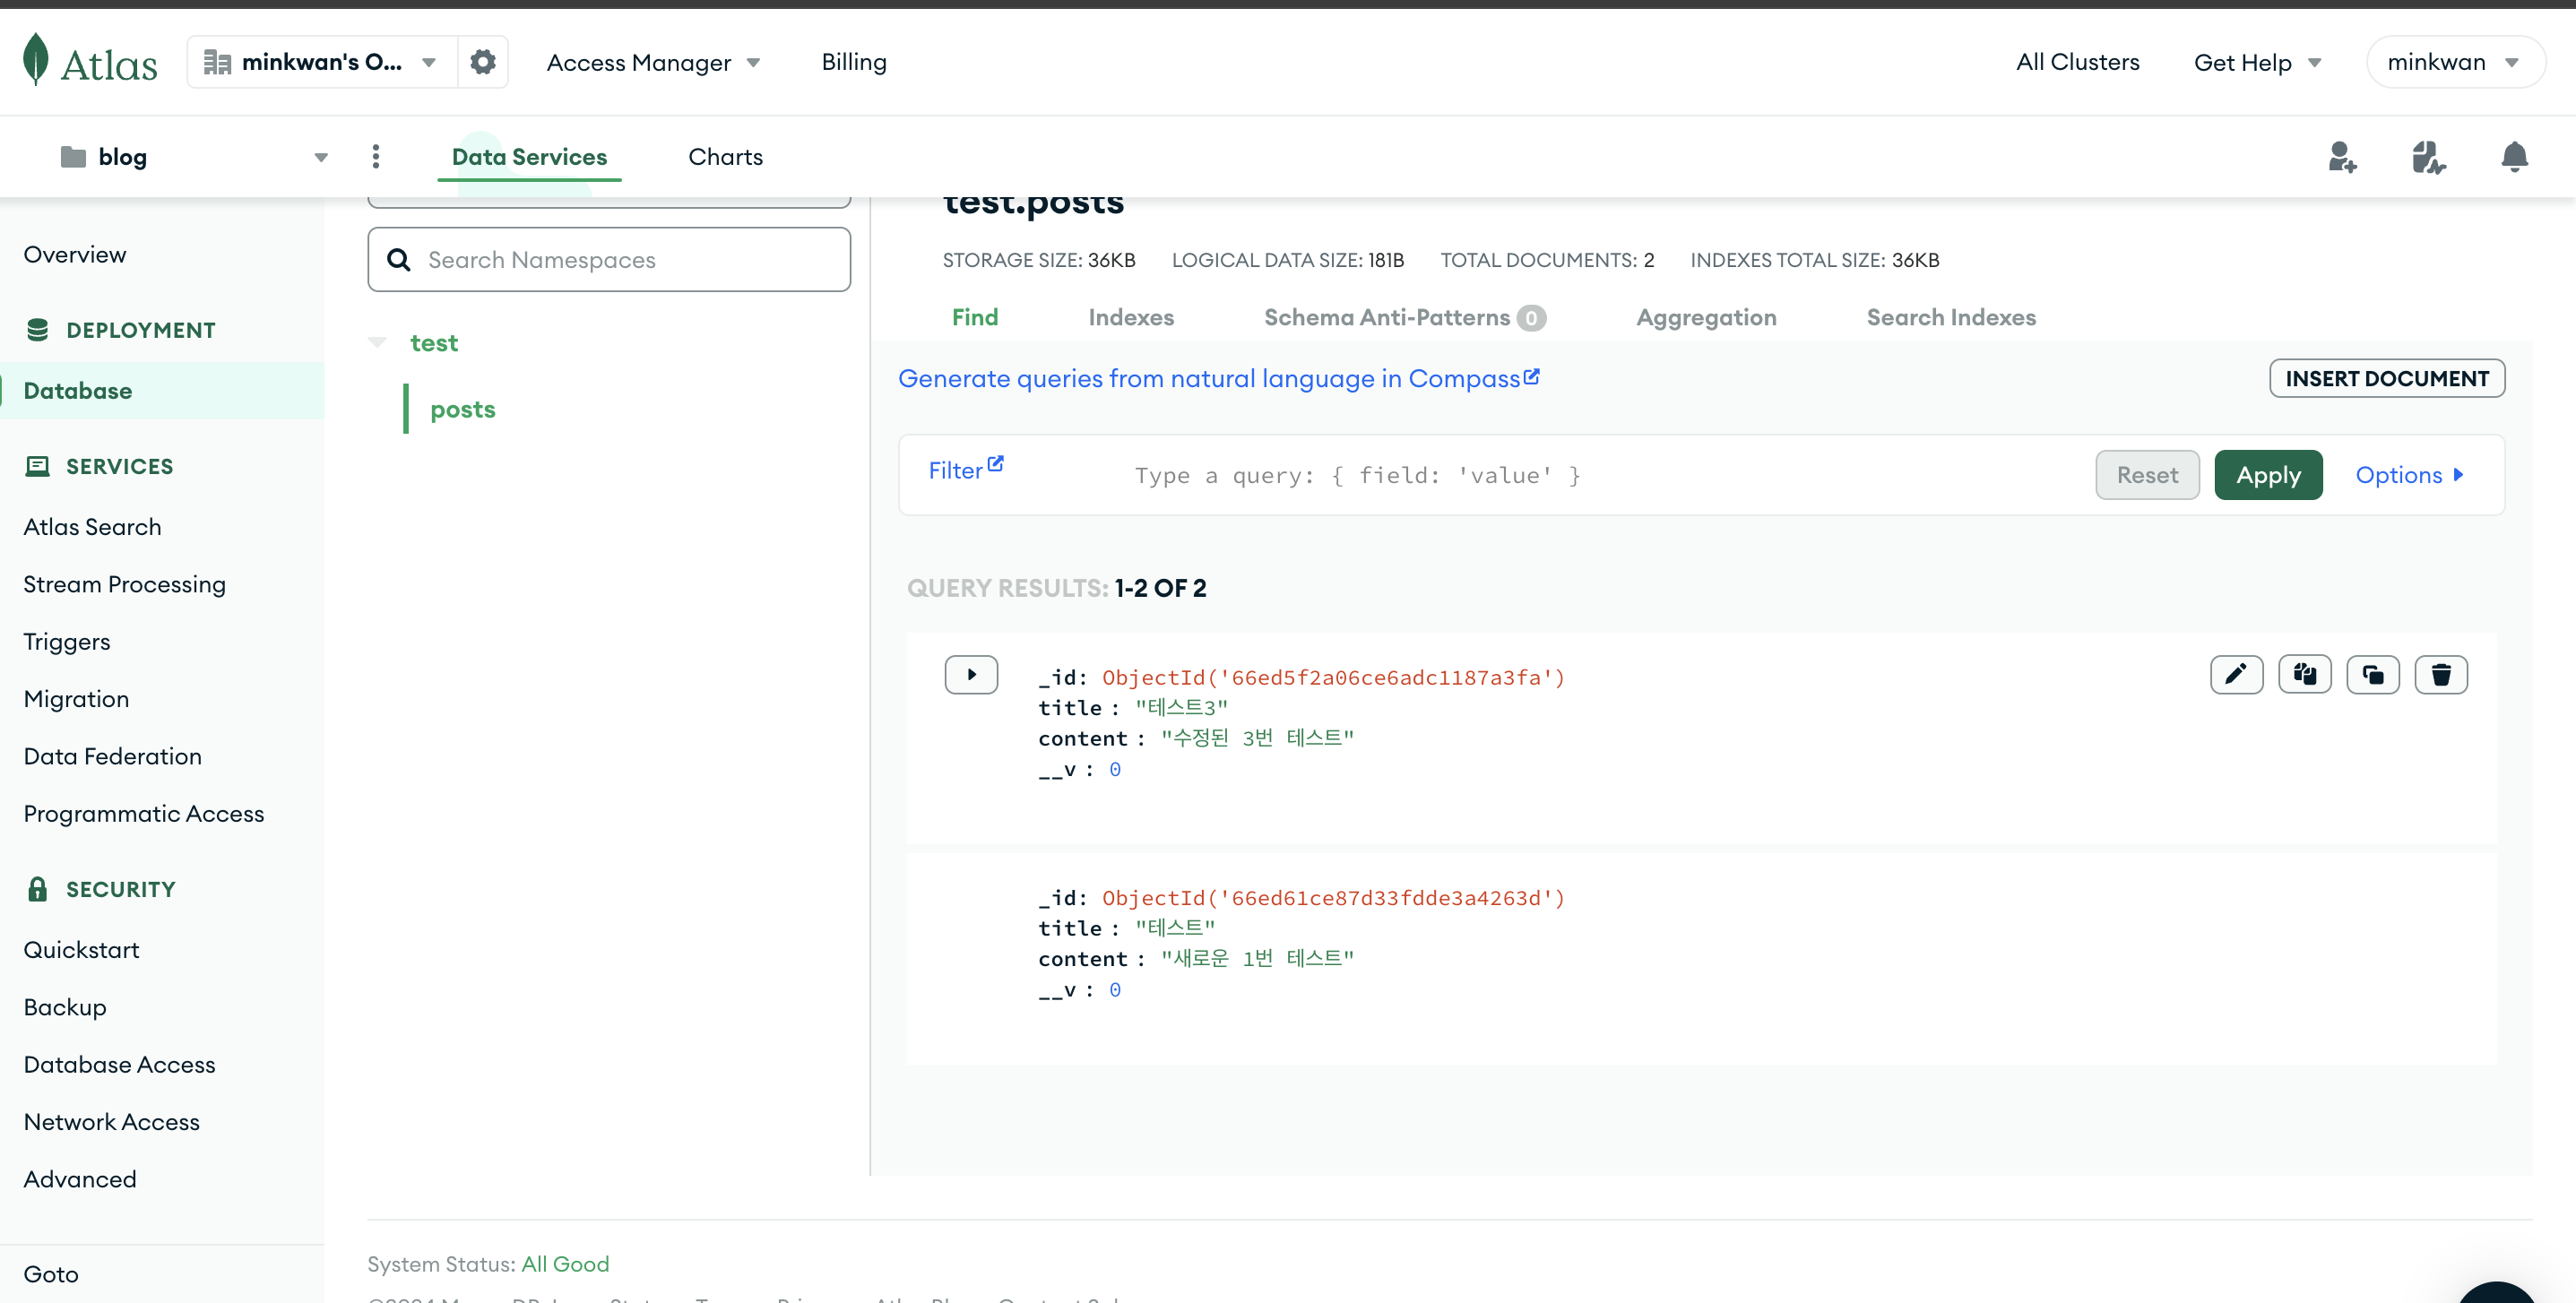
✅ 구현된 모습
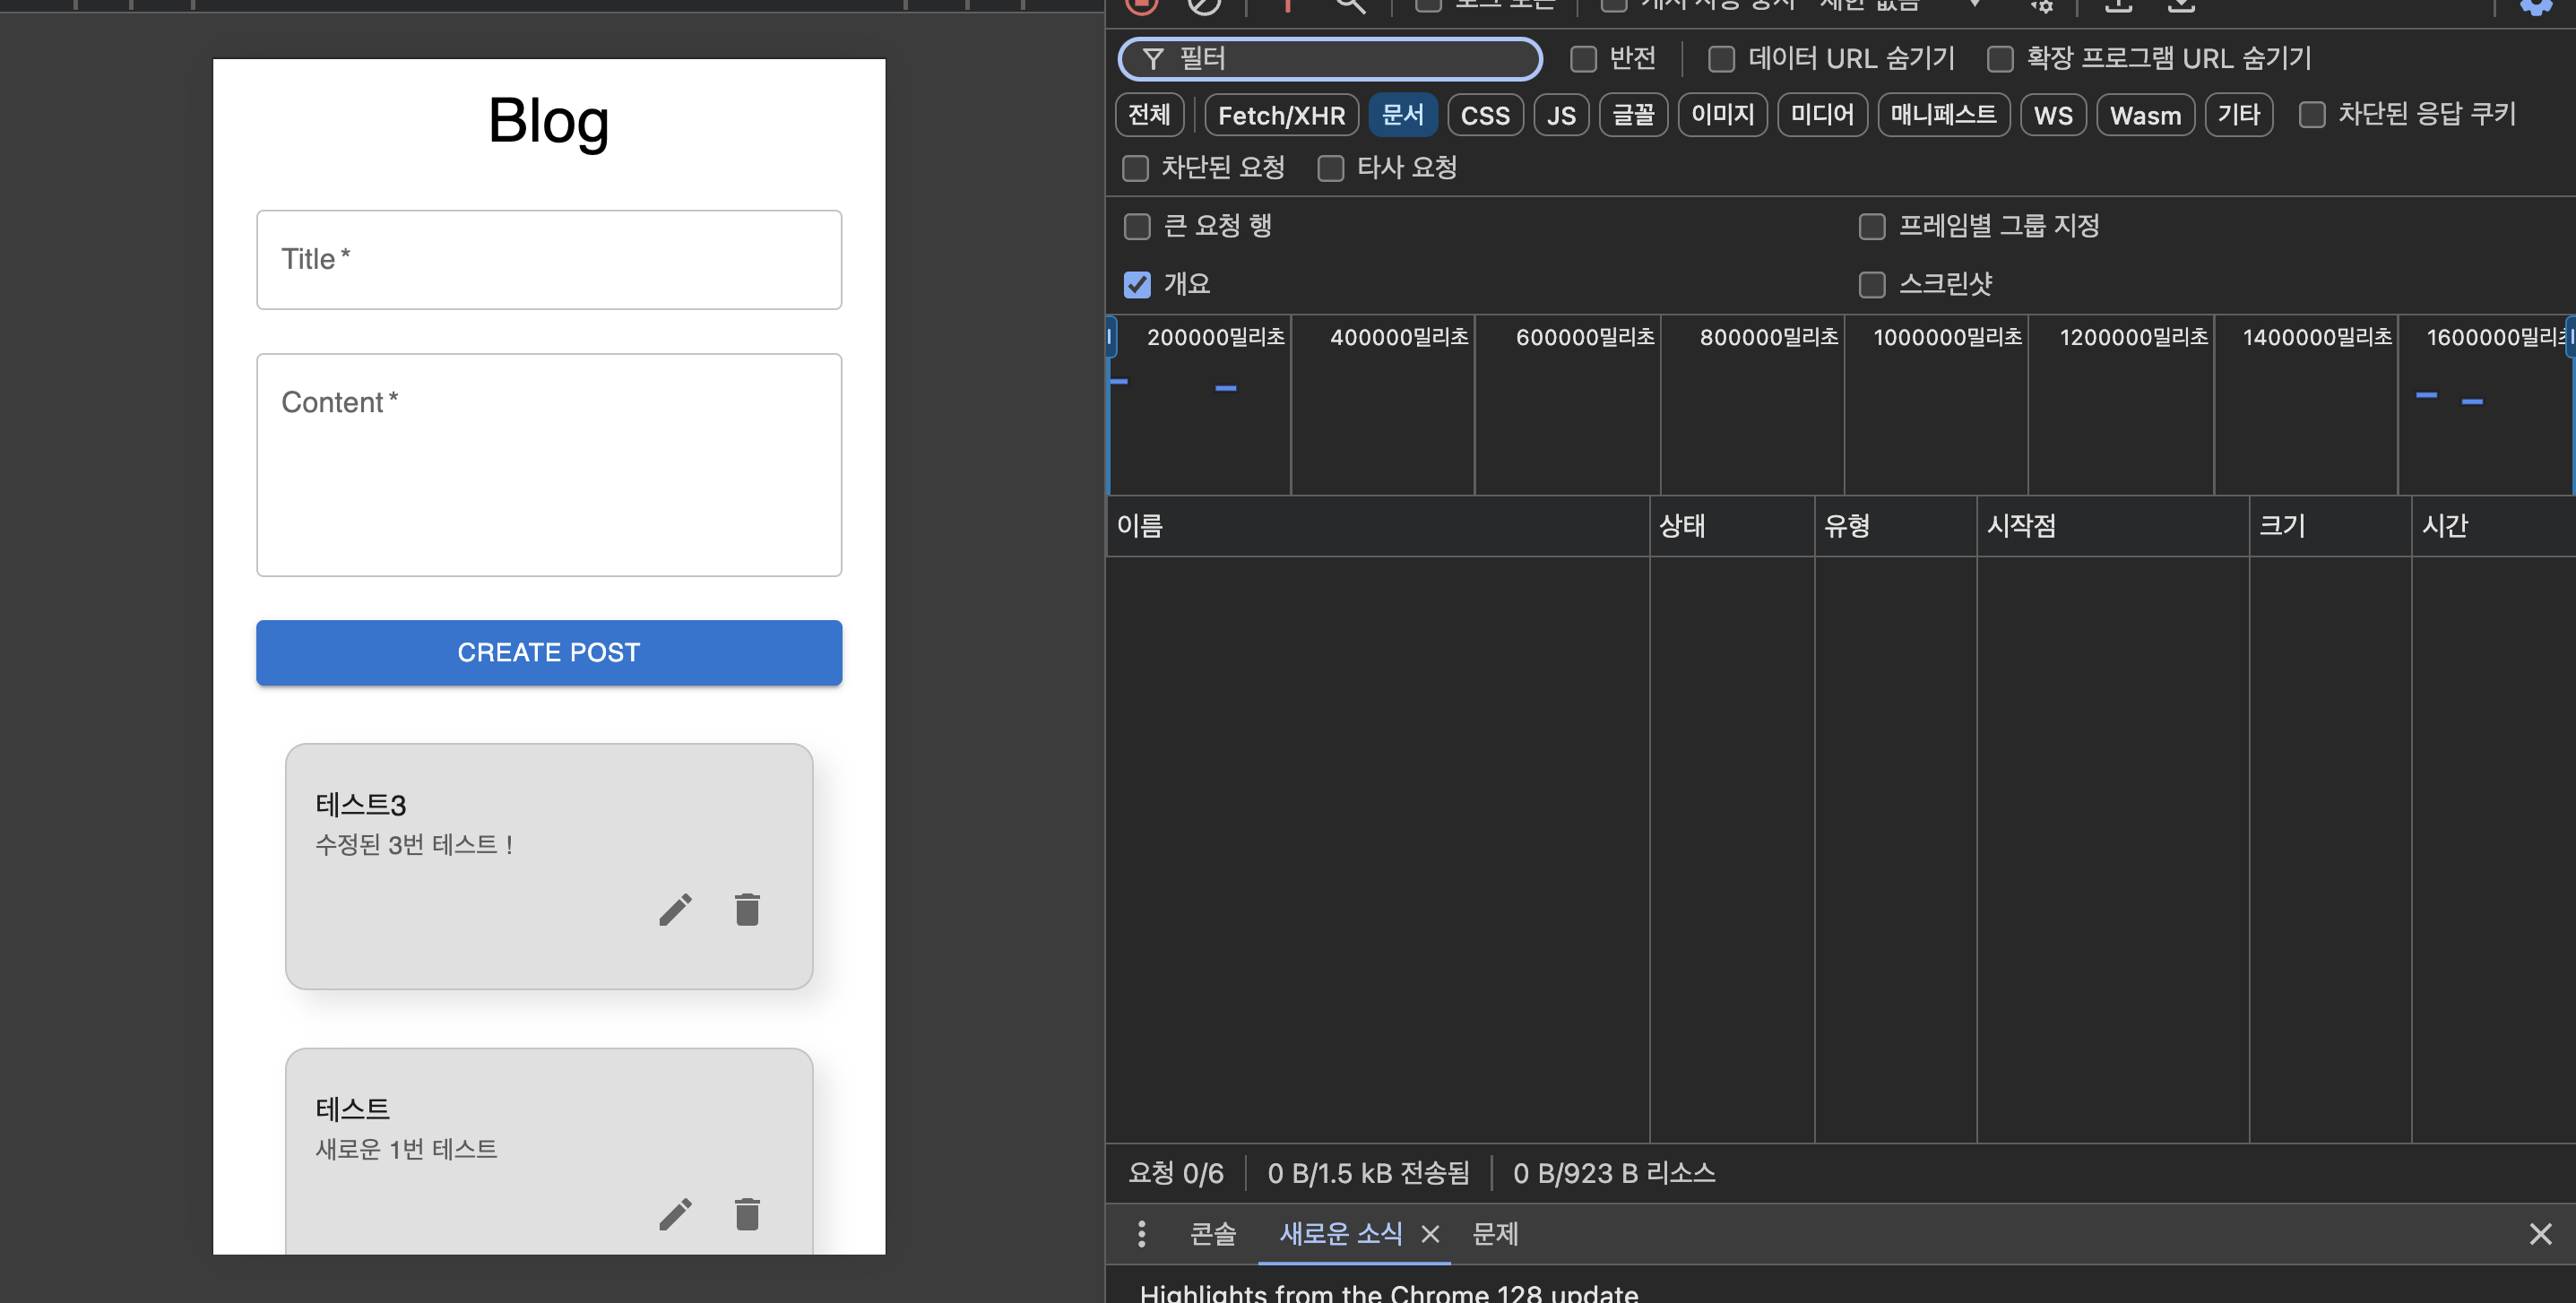
일단 돌아가게 만들어 놓은 모델이라 이해의 수준이 굉장히 낮은 상태라고 볼 수 있고, 따라서 사실상 이제 공부 시작이다.
✅ 회고
문유석 판사의 <개인주의자 선언>에는 다음과 같은 문장이 등장한다.
More to read
프론트엔드와 백엔드 사이
HTTP 상태 코드는 프론트엔드에서 백엔드로 보냈던 요청의 수행 결과를 의미하는 일종의 약속이며, API를 구성하는 핵심 요소 중 하나입니다. 상태 코드와 관련하여, 백엔드는 잘 모르는 프론트엔드의 슬픈 사정이 있습니다.아래는 요청이 실패했음에도, 백엔드에서 상태 코드
JWT토큰 관리 방식 톺아보기
0. 들어가며 🎯 서비스에 접근하려는 사용자가 누구인지 확인하는 과정을 사용자 인증이라고 합니다. 인증된 사용자에게 주어진 권한을 확인하는 작업은 인가라고 부릅니다. 이번 글에서는 인가는 다루지 않습니다. 사용자 인증에는 많은 방식이 있지만, 오늘은 세션 인증 방
A2AA2A / MCP 멀티 에이전트 오케스트레이션
0. 들어가며 ✍️ Google for Developers에, 레스토랑 공급망 시나리오로 엮은 6대 프로토콜(MCP, A2A, UCP, AP2, A2UI, AG-UI)에 대한 가이드가 게시된 이후, MCP와 A2A부터 구현해 보는 것이 좋을 것 같다는 생각이 들었습니