[TIL/Coin Site Project] 2023/12/26
✅ The Table element 프로젝트 메인 페이지의 테이블을 구현할 차례이다. MUI와 같은 라이브러리를 통해 view를 구현하는 것 자체는 그리 어려운 일이 아니다. 다만, 제공되는 템플릿을 명확하게 이해하여 다양한 요구사항에 확장성 있게 대응하는 것이 더
✅ The Table element
프로젝트 메인 페이지의 테이블을 구현할 차례이다. MUI와 같은 라이브러리를 통해 view를 구현하는 것 자체는 그리 어려운 일이 아니다. 다만, 제공되는 템플릿을 명확하게 이해하여 다양한 요구사항에 확장성 있게 대응하는 것이 더 중요하겠다. 이러한 관점에서 가장 먼저 학습해야 할 대상은 다름아닌 HTML의 table tag이다.
mdn에 따르면, table은 HTML의 요소로서, 행과 열로 구성된 2차원 정보를 표현하기 위해 사용하는 tag이다. 한마디로 table을 만들 때 사용하는 tag가 table tag이다.
✅ Try it
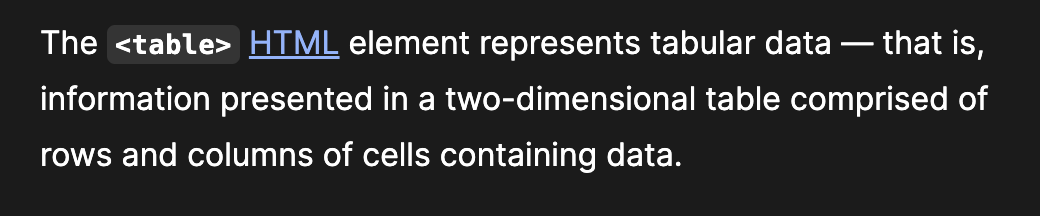
공식문서에서 제공하는 예제 코드를, styled components를 통해 구현했다.
import styled from "styled-components";

const TableHeadStyle = styled.thead`
  background-color: #333;
  color: #fff;
`;

const TableBorder = styled.td`
  border: 1px solid #333;
`;

function App() {
  return (
    <TableBorder>
      <TableHeadStyle>
        <tr>
          <th colspan="2">The table header</th>
        </tr>
      </TableHeadStyle>
      <tbody>
        <tr>
          <TableBorder>The table body</TableBorder>
          <TableBorder>with two columns</TableBorder>
        </tr>
      </tbody>
    </TableBorder>
  );
}

export default App;
thead, tbody, tr, th, td 태그를 알아봐야 한다.
✅ thead, tbody, tr, th, td
- thead: table에서 머리글 부분을 정의하는 태그이다. 표의 주요 column 제목을 나타낼 때 사용하는 태그이다.
- tbody: table의 본문 부분을 정의하는 태그이다. column 제목을 제외한 table에 실제로 표시되어야 할 데이터들을 tbody 태그 내부에 위치시켜야 한다.
- tr: tr태그는 표의 각 행(row)을 정의하는 태그이다. td는 table의 데이터인데, tr 태그 내부에 위치하는 td 요소의 개수가 3개라고 가정하면, 각각의 요소는 1행 1열, 1행 2열, 1행 3열의 요소가 된다.
- th: th는 표의 헤더셀을 정의하는 태그로서, 주로 thead 내부에서 사용되며, 굵은 글씨체로 표시되어 열의 제목이나 중요한 정보를 나타내는 태그이다.
- td: td는 table의 데이터를 정의하는 태그이다.
추가적으로, 위 Try it 예제에서 사용된 colspan 속성은, 셀을 여러 열에 결쳐 표현하고자 할 때 사용하는 속성이다. The table header라는 제목은 두 개의 열을 차지하게 되는 것이다.
더 자세한 내용은 다양한 예제를 직접 입력해보며 살펴보겠다.
✅ Examples
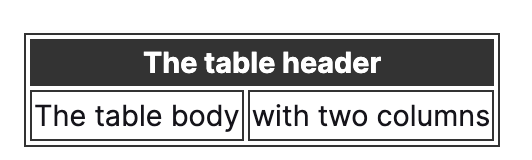
1. Simple table
<table>
  <tr>
    <td>John</td>
    <td>Doe</td>
  </tr>
  <tr>
    <td>Jane</td>
    <td>Doe</td>
  </tr>
</table>
table 태그로 감싸져 있으니 2차원 테이블 형태의 자료일 것이고, '두 section의 tr'로 나누어져 있으니 해당 자료는 2행으로 구성될 것이다. 1행 1열의 데이터는 John, 1행 2열의 데이터는 Doe, 2행 1열의 데이터는 Jane, 2행 2열의 데이터는 Doe가 될 것이다. 별도의 스타일링은 적용되지 않았다.
2. Further simple examples
import React from "react";
import styled from "styled-components";
const StyledTable = styled.table`
border-collapse: collapse;
border-spacing: 0px;
padding: 5px;
border: 1px solid black;
`;
const StyledCell = styled.td`
padding: 5px;
border: 1px solid black;
`;
const StyledHeaderCell = styled.th`
padding: 5px;
border: 1px solid black;
`;
const App = () => {
return (
<>
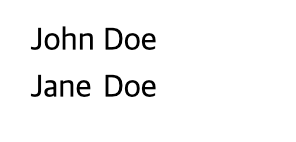
{/* 1번 예제 테이블 */}
<p>Simple table with header</p>
<StyledTable>
{/* 1행: th tag를 통해 글자가 볼드처리 됨 */}
<tr>
<StyledHeaderCell>First name</StyledHeaderCell>
<StyledHeaderCell>Last name</StyledHeaderCell>
</tr>
{/* 2행: td tag를 통해 데이터 표현 */}
<tr>
<StyledCell>John</StyledCell>
<StyledCell>Doe</StyledCell>
</tr>
{/* 3행: td tag를 통해 데이터 표현 */}
<tr>
<StyledCell>Jane</StyledCell>
<StyledCell>Doe</StyledCell>
</tr>
</StyledTable>
{/* 2번 예제 테이블 */}
<p>Table with thead, tfoot, and tbody</p>
<StyledTable>
{/* 1행: 1번 예제와 동일하나, thead tag로 감싼 코드 */}
<thead>
<tr>
<StyledHeaderCell>Header content 1</StyledHeaderCell>
<StyledHeaderCell>Header content 2</StyledHeaderCell>
</tr>
</thead>
{/* 2행: 1번 예제와 동일하나, tbody tag로 감싼 코드 */}
<tbody>
<tr>
<StyledCell>Body content 1</StyledCell>
<StyledCell>Body content 2</StyledCell>
</tr>
</tbody>
{/* 3행: 1번 예제와 동일하나, tfoot tag로 감싼 코드 */}
<tfoot>
<tr>
<StyledCell>Footer content 1</StyledCell>
<StyledCell>Footer content 2</StyledCell>
</tr>
</tfoot>
</StyledTable>
{/* 3번 예제 테이블 */}
<p>Table with colgroup</p>
<StyledTable>
{/* colgroup은 특정 열에 대한 스타일이나 속성을 한 번에 적용할 수 있게 해주는 그룹 역할을 함 */}
{/* span은 뭐지? */}
<colgroup span="4"></colgroup>
{/* 1행 */}
<tr>
<StyledHeaderCell>Countries</StyledHeaderCell>
<StyledHeaderCell>Capitals</StyledHeaderCell>
<StyledHeaderCell>Population</StyledHeaderCell>
<StyledHeaderCell>Language</StyledHeaderCell>
</tr>
{/* 2행 */}
<tr>
<StyledCell>USA</StyledCell>
<StyledCell>Washington, D.C.</StyledCell>
<StyledCell>309 million</StyledCell>
<StyledCell>English</StyledCell>
</tr>
{/* 3행 */}
<tr>
<StyledCell>Sweden</StyledCell>
<StyledCell>Stockholm</StyledCell>
<StyledCell>9 million</StyledCell>
<StyledCell>Swedish</StyledCell>
</tr>
</StyledTable>
{/* 4번 예제 테이블 */}
<p>Table with colgroup and col</p>
<StyledTable>
{/* colgroup은 한마디로 col의 집합 */}
{/* 첫 번째 col에는 "0f0" 컬러가 적용됨 */}
<colgroup>
<col style={{ backgroundColor: "#0f0" }} />
<col span="2" />
</colgroup>
<tr>
<StyledHeaderCell>Lime</StyledHeaderCell>
<StyledHeaderCell>Lemon</StyledHeaderCell>
<StyledHeaderCell>Orange</StyledHeaderCell>
</tr>
<tr>
<StyledCell>Green</StyledCell>
<StyledCell>Yellow</StyledCell>
<StyledCell>Orange</StyledCell>
</tr>
</StyledTable>
{/* 5번 예제 테이블 */}
<p>Simple table with caption</p>
<StyledTable>
{/* caption은 뭐지? */}
<caption>Awesome caption</caption>
<tr>
<StyledCell>Awesome data</StyledCell>
</tr>
</StyledTable>
</>
);
};
export default App;
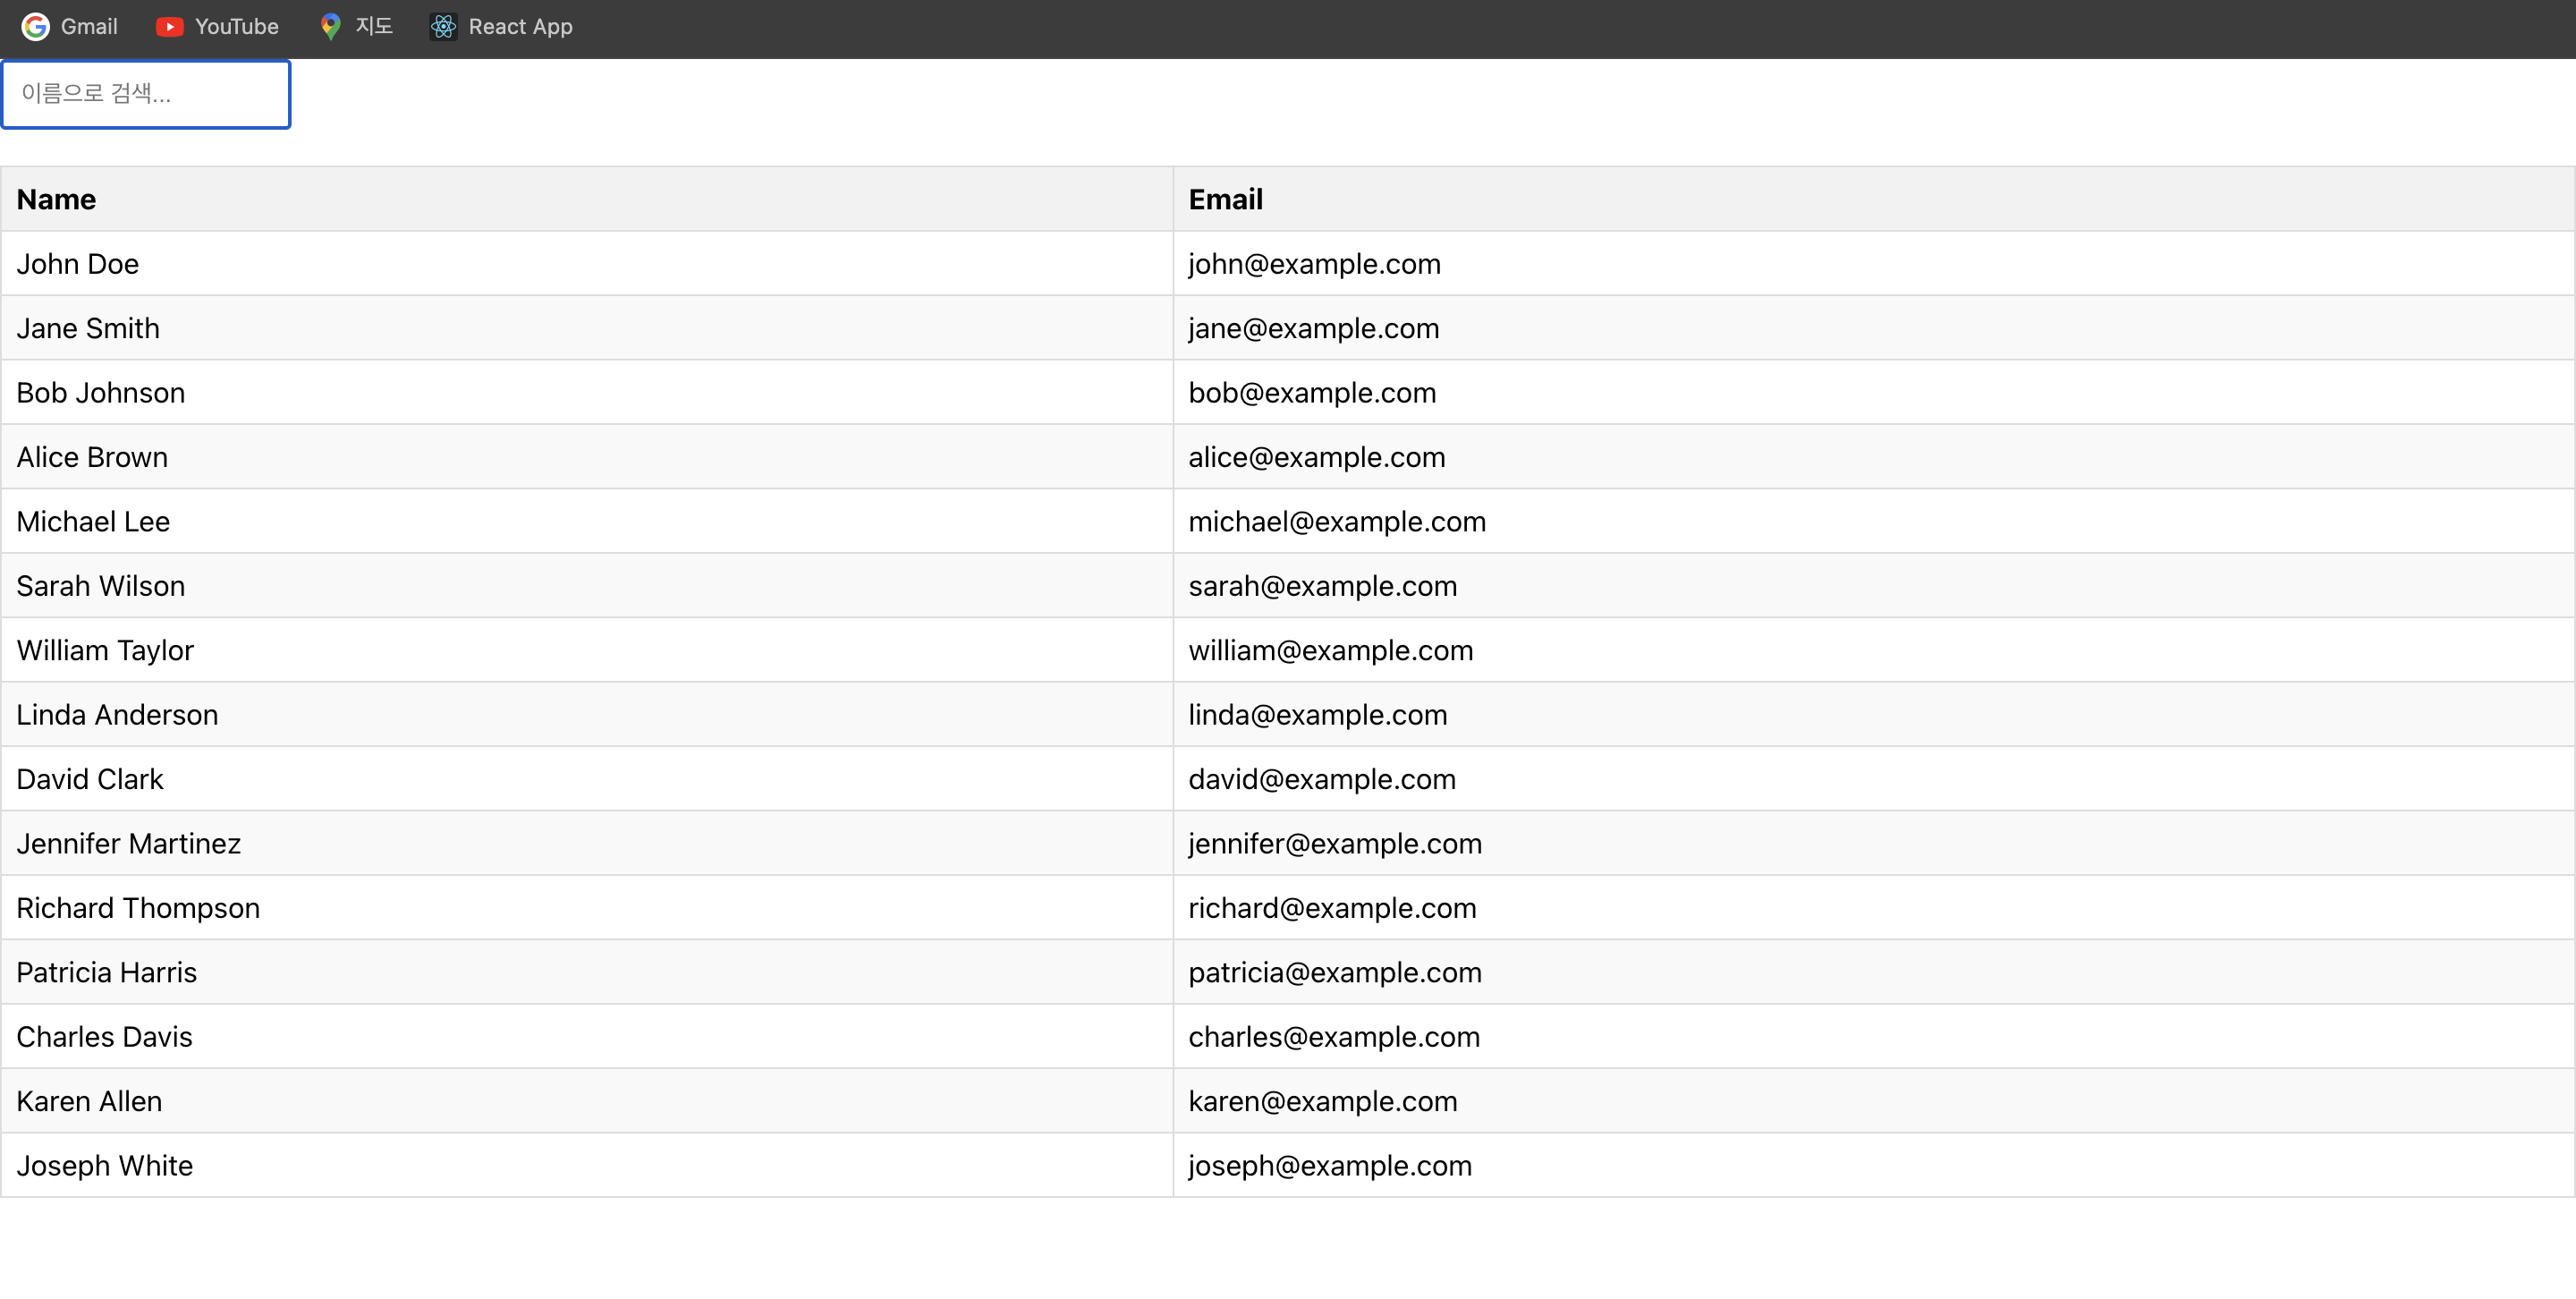
✅ Table에 filtering 적용해 보기
App.js
import React from "react";
import FilterableTable from "./FilterableTable";

const App = () => {
  // name과 email로 구성된 예제 data
  const data = [
    { name: "John Doe", email: "john@example.com" },
    { name: "Jane Smith", email: "jane@example.com" },
    { name: "Bob Johnson", email: "bob@example.com" },
    { name: "Alice Brown", email: "alice@example.com" },
    { name: "Michael Lee", email: "michael@example.com" },
    { name: "Sarah Wilson", email: "sarah@example.com" },
    { name: "William Taylor", email: "william@example.com" },
    { name: "Linda Anderson", email: "linda@example.com" },
    { name: "David Clark", email: "david@example.com" },
    { name: "Jennifer Martinez", email: "jennifer@example.com" },
    { name: "Richard Thompson", email: "richard@example.com" },
    { name: "Patricia Harris", email: "patricia@example.com" },
    { name: "Charles Davis", email: "charles@example.com" },
    { name: "Karen Allen", email: "karen@example.com" },
    { name: "Joseph White", email: "joseph@example.com" },
  ];

  // 예제 data를 props로 전달
  return <FilterableTable data={data} />;
};

export default App;
FilterableTable.js
import React, { useState } from "react";
import styled from "styled-components";

const FilterInput = styled.input`
  padding: 10px;
  margin-bottom: 20px;
`;

const Table = styled.table`
  width: 100%;
  border-collapse: collapse;
`;

const Th = styled.th`
  background-color: #f2f2f2;
  border: 1px solid #ddd;
  padding: 8px;
  text-align: left;
`;

const Td = styled.td`
  border: 1px solid #ddd;
  padding: 8px;
  text-align: left;
`;

const TableRow = styled.tr`
  &:nth-child(even) {
    background-color: #f9f9f9;
  }
`;

const FilterableTable = ({ data }) => {
  const [filter, setFilter] = useState("");

  const filteredData = data?.filter((elem) =>
    elem.name.toLowerCase().includes(filter.toLowerCase())
  );

  return (
    <div>
      {/* 검색어 input field */}
      <FilterInput
        type="text"
        placeholder="이름으로 검색..."
        value={filter}
        onChange={(e) => setFilter(e.target.value)}
      />
      {/* table section */}
      <Table>
        {/* head section */}
        <thead>
          <tr>
            <Th>Name</Th>
            <Th>Email</Th>
          </tr>
        </thead>
        {/* body section */}
        <tbody>
          {filteredData.map((elem, idx) => (
            <TableRow key={idx}>
              <Td>{elem.name}</Td>
              <Td>{elem.email}</Td>
            </TableRow>
          ))}
        </tbody>
      </Table>
    </div>
  );
};

export default FilterableTable;

More to read
프론트엔드와 백엔드 사이
HTTP 상태 코드는 프론트엔드에서 백엔드로 보냈던 요청의 수행 결과를 의미하는 일종의 약속이며, API를 구성하는 핵심 요소 중 하나입니다. 상태 코드와 관련하여, 백엔드는 잘 모르는 프론트엔드의 슬픈 사정이 있습니다.아래는 요청이 실패했음에도, 백엔드에서 상태 코드
JWT토큰 관리 방식 톺아보기
0. 들어가며 🎯 서비스에 접근하려는 사용자가 누구인지 확인하는 과정을 사용자 인증이라고 합니다. 인증된 사용자에게 주어진 권한을 확인하는 작업은 인가라고 부릅니다. 이번 글에서는 인가는 다루지 않습니다. 사용자 인증에는 많은 방식이 있지만, 오늘은 세션 인증 방
A2AA2A / MCP 멀티 에이전트 오케스트레이션
0. 들어가며 ✍️ Google for Developers에, 레스토랑 공급망 시나리오로 엮은 6대 프로토콜(MCP, A2A, UCP, AP2, A2UI, AG-UI)에 대한 가이드가 게시된 이후, MCP와 A2A부터 구현해 보는 것이 좋을 것 같다는 생각이 들었습니